Dieser Artikel beschreibt, wie Sie die Rückabdeckung von Blink-Geräten entfernen. Sie können die Rückabdeckung entfernen, um Batterien einzulegen oder um den QR-Code für einige Blink-Geräte zu finden.
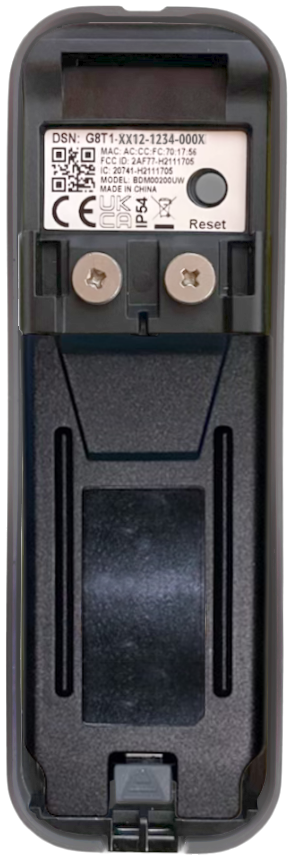
Der QR-Code, der die Geräteseriennummer (DSN) enthält, befindet sich auf der Rückseite einiger Blink-Geräte oder im Inneren des Geräts. Sie können den QR-Code auch in der Einrichtungsanleitung finden, die der Verpackung beiliegt.
Entfernen der Rückabdeckung von Kameras
Outdoor 4
In diesem Artikel wird beschrieben, wie Sie die hintere Abdeckung des Outdoor 4 entfernen und die Batterien austauschen.

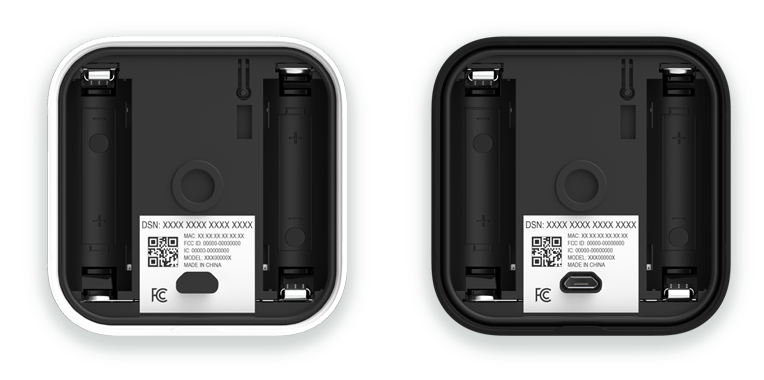
*Die Outdoor 4 kann über ihren USB-C-Anschluss mit einem wetterfesten USB-C-Adapter mit Strom versorgt werden. Sobald die Abdeckung des USB-Anschlusses entfernt wird, ist die Kamera jedoch nicht mehr wetterfest, bis sie wieder eingesetzt wird.
So entfernen Sie die hintere Abdeckung
Verwenden Sie das mitgelieferte Winkel-/Adapteröffnungswerkzeug oder einen großen Schraubendreher, um die rückseitige Abdeckung Ihrer Kamera zu entfernen.
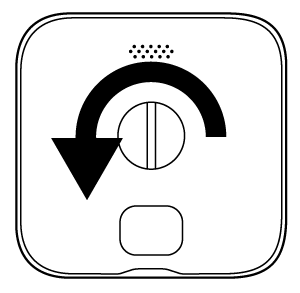
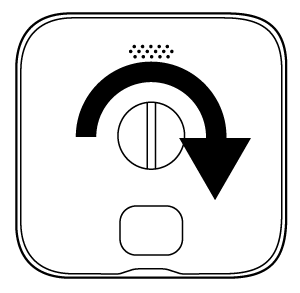
1. Drehen Sie die Schraube nach links (gegen den Uhrzeigersinn), bis sie sich frei drehen lässt.

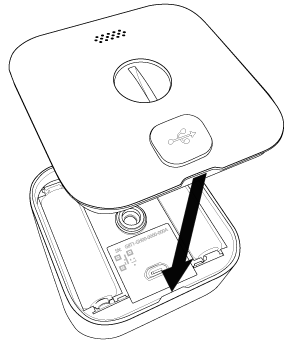
2. Verwenden Sie das Winkel-/Adapteröffnungswerkzeug, um die hintere Abdeckung vorsichtig in eine Richtung zu hebeln und anzuheben.
So installieren Sie Ihre Batterien
Sobald Sie die hintere Abdeckung entfernt haben, legen Sie die Batterien so ein, dass der Pluspol (+) und der Minuspol (-) im Batteriefach ausgerichtet sind.
Hinweis: Blink-Kameras sind nur mit nicht wiederaufladbaren AA 1,5-Volt-Lithium-Batterien kompatibel.
So tauschen Sie die hintere Abdeckung aus
Um sicherzustellen, dass die hintere Abdeckung richtig platziert wird, ist ein Pfosten in das Design integriert. Die hintere Abdeckung passt nur, wenn der Pfosten mit dem Schlüsselloch an der Kamera ausgerichtet ist.
1. Richten Sie den Pfosten der hinteren Abdeckung auf das Schlüsselloch neben dem USB-Anschluss der Kamera aus und drücken Sie zum Schließen darauf.

2. Verwenden Sie das Winkel-/Adapteröffnungswerkzeug, eine Münze oder einen großen Schraubendreher, um die Schraube etwa drei Umdrehungen nach rechts (im Uhrzeigersinn) zu drehen, bis die hintere Abdeckung bündig mit der Kamera abschließt.
Video Doorbell
In diesem Artikel wird beschrieben, wie Sie die hintere Abdeckung entfernen und die Batterien für die Video Doorbell einlegen oder austauschen.
Bevor Sie beginnen
Entriegelungsschlüssel
Suchen Sie den Entriegelungsschlüssel, der in der Verpackung der Türklingel auf die Papierschablone geklebt war. Wenn Sie Ihren Entriegelungsschlüssel verlegt haben, wenden Sie sich bitte an den Kundenservice. Wir senden Ihnen dann einen neuen zu.

Entfernen Sie die Türklingel von der Montageplatte
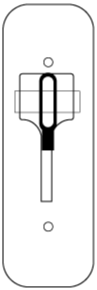
- Drücken Sie den Entriegelungsschlüssel gerade in den Schlitz an der Unterseite, um die Sperre zu lösen.
- Ziehen Sie die Türklingel nach dem Lösen von der Montageplatte ab.

Entfernen Sie die hintere Abdeckung
- Um die hintere Abdeckung zu entfernen, drehen Sie die Türklingel um, sodass Sie auf die Rückseite schauen (siehe unten).
- Heben Sie mit dem Fingernagel den grauen Riegel an der Unterseite der Türklingel an. Dadurch wird die wetterfeste Abdeckung freigegeben.
Hinweis: Bewahren Sie die Abdeckung während des Batteriewechsels an einem sicheren Ort auf.

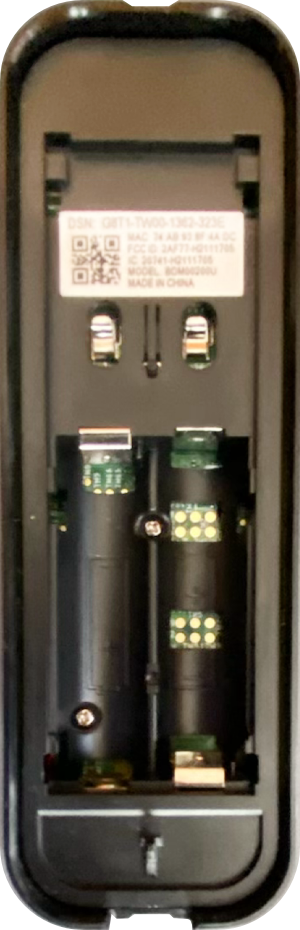
Einsetzen oder Austauschen der Batterien
Sobald Sie die hintere Abdeckung entfernt haben, legen Sie die nicht wiederaufladbaren AA 1,5-Volt-Lithiumbatterien so ein, dass der positive (+) und der negative (-) Pol im Batteriefach ausgerichtet sind.
Bringen Sie die hintere Abdeckung wieder an
- Führen Sie die Laschen oben an der Tür in die Schlitze neben den Anschlussschrauben ein.
- Drücken Sie auf die Unterseite der Rückabdeckung, bis Sie sehen und hören, wie der graue Riegel einrastet.
Bringen Sie Ihre Türklingel wieder an
- Richten Sie die Oberseite der Türklingel an der Oberseite der Rückplatte aus, damit der Haken einrastet.
- Drücken Sie dann die Unterseite der Türklingel fest gegen die Rückplatte, bis Sie ein Klicken spüren und hören.
- Wenn Sie die Stromzufuhr zu Ihrem Klingelsystem ausgeschaltet hatten, schalten Sie sie wieder ein.
- Drücken Sie nach dem Wiedereinbau die Klingeltaste, um sie zu testen.
Anleitung für eine 2-Loch-Rückwand
Wenn Ihre Türklingel eine 2-Loch-Rückwand hat, gehen Sie wie folgt vor, um die Batterien zu ersetzen.
Entfernen Sie die Türklingel von der Montageplatte
- Drücken Sie den Entriegelungsschlüssel gerade in den Schlitz an der Unterseite, um die Sperre zu lösen.
- Ziehen Sie die Türklingel nach dem Lösen von der Montageplatte ab, und schieben Sie die Türklingel nach oben, während Sie sie von der Montageplatte wegschwenken.
Ersetzen Sie die Batterien
Nachdem Sie die Türklingel von der Montageplatte entfernt haben, drehen Sie die Kamera um und tauschen Sie die Batterien aus.
Bringen Sie Ihre Türklingel wieder an
- Richten Sie die Oberseite der Türklingel an der Oberseite der Rückplatte aus, damit der Haken einrastet.
- Drücken Sie dann die Unterseite der Türklingel fest gegen die Rückplatte, bis Sie ein Klicken spüren und hören.
- Wenn Sie die Stromzufuhr zu Ihrem Klingelsystem ausgeschaltet hatten, schalten Sie sie wieder ein.
- Drücken Sie nach dem Wiedereinbau die Klingeltaste, um sie zu testen.
Outdoor und Indoor (3rd Gen)
In diesem Artikel finden Sie eine Anleitung zum Entfernen der Rückabdeckung und zum Einlegen der Batterien für Blink Outdoor und Indoor (3rd Gen) Kameras.
Bevor Sie beginnen
Vergewissern Sie sich, dass die Kamera von allen Halterungen oder Zubehörteilen getrennt ist, bevor Sie versuchen, die Rückabdeckung zu entfernen. Dies gilt auch für Produkte von Drittanbietern, an die sie angeschlossen sein kann.
Wenn die Kamera ganz neu ist, zeigt ein Plastikaufkleber auf der Rückseite der Kamera an, in welche Richtung Sie sich drehen müssen. Ziehen Sie diesen Aufkleber ab, bevor Sie die Kamera benutzen.
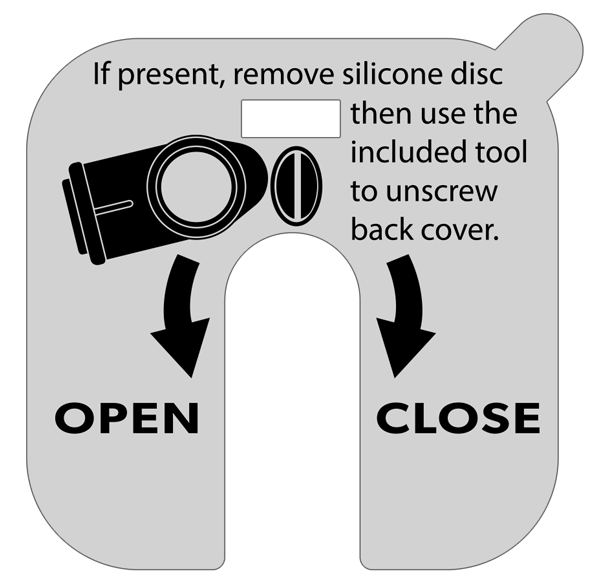
Entfernen Sie die Rückabdeckung und öffnen Sie die Kamera
- Wenn eine Schutzabdeckung aus Silikon vorhanden ist, entfernen Sie diese von der Befestigungsschraube und legen Sie sie zur zukünftigen Verwendung beiseite.
- Drehen Sie die Schraube mit dem beiliegenden Öffnungswerkzeug gegen den Uhrzeigersinn (nach links), bis sich die Schraube frei drehen lässt. Wenn das Werkzeug nicht zur Verfügung steht, kann auch ein gleichwertiger Gegenstand wie eine Münze oder ein Schlitzschraubendreher verwendet werden.

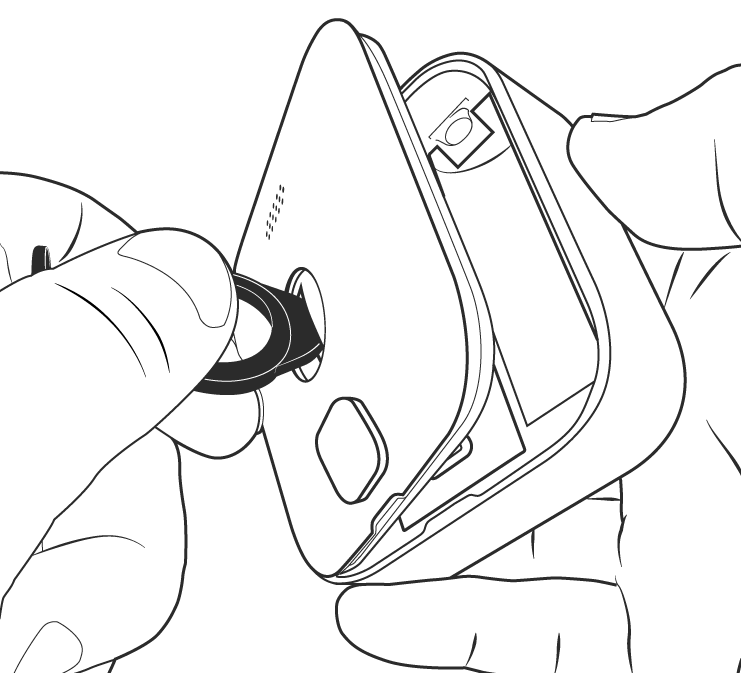
- Setzen Sie das Werkzeug in den Schlitz ein, üben Sie seitlichen Druck auf das Werkzeug aus und hebeln Sie die Abdeckung vorsichtig ab. Wie in der Abbildung gezeigt, halten Sie die Kamera mit einer Hand auf der Seite, während Sie mit der anderen Hand ziehen.
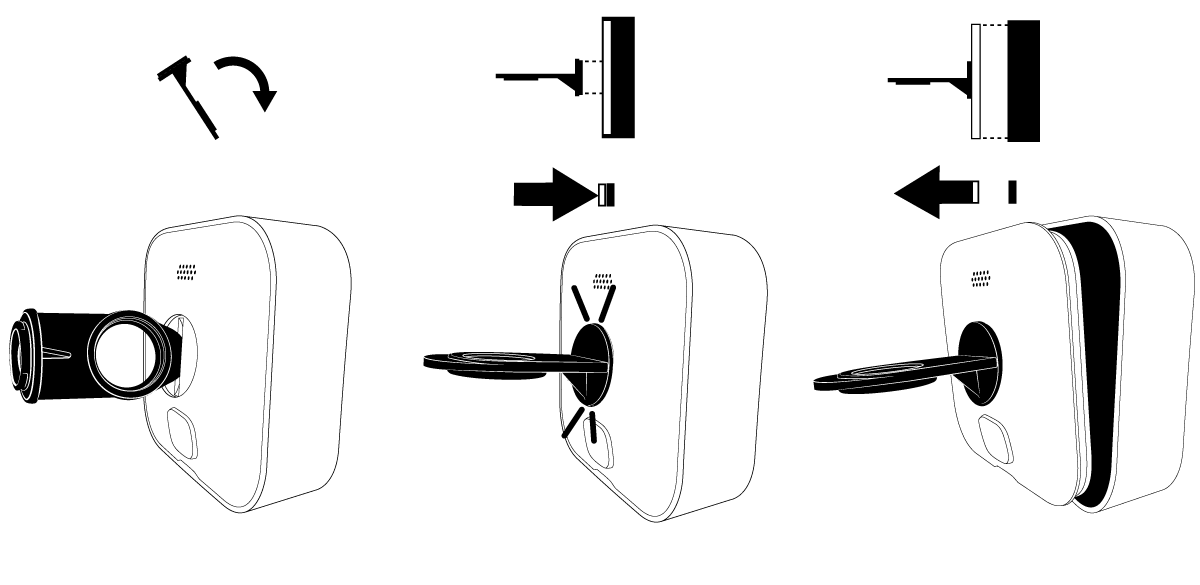
Optionale Anweisungen: Es gibt eine weitere Möglichkeit, die hintere Abdeckung zu entfernen.
- Nachdem Sie die Schraube vollständig herausgedreht haben, drehen Sie das Öffnungswerkzeug um und führen das Befestigungsende in das Loch der Kamerarückwand ein. Sie spüren und hören ein Klicken, wenn das Werkzeug gesichert ist.
- Halten Sie die Kamera mit einer Hand und ziehen Sie das Öffnungswerkzeug vorsichtig nach hinten. Dadurch lässt sich die hintere Abdeckung abnehmen.
Batterien einsetzen oder austauschen
Wenn Sie die hintere Abdeckung entfernt haben, erhalten Sie Zugriff auf das Batteriefach. Legen Sie die 2 AA-Lithiumbatterien in ihre Steckplätze ein oder ersetzen Sie sie. Achten Sie dabei darauf, dass die + und – Kennzeichnung auf der Kamera mit den Markierungen + und – auf den Batterien übereinstimmen.
Bringen Sie die hintere Abdeckung wieder an und befestigen Sie sie
- Richten Sie die Führungskerben wie gezeigt aus und drücken Sie die Abdeckung wieder fest gegen das Kameragehäuse.
- Ziehen Sie die Schraube im Uhrzeigersinn (nach rechts drehend) handfest an, bis sie fest sitzt. Achten Sie darauf, dass die Schrauben nicht zu fest angezogen werden. Wenn Sie fertig sind, sollte die Abdeckung mit dem Kameragehäuse bündig abschließen.
XT2 und XT
Dieser Artikel zeigt Ihnen, wie Sie die Batterieabdeckung von Ihrer Blink XT Kamera entfernen.
1. Halten Sie die Kamera so, dass die Rückseite zu Ihnen zeigt.
2. Sie werden einen grauen Schalter mit einem Pfeil bemerken, der zur Unterseite der Kamera zeigt. Schieben Sie ihn in Pfeilrichtung und halten Sie ihn dort.
3. Ziehen Sie dabei mit dem Daumen die Batterieabdeckung nach oben. Dies kann etwas Kraft erfordern, da die Kamera luftdicht ist.
4. Heben Sie die Batterieabdeckung von der Kamera ab.
Das war‘s, jetzt können Sie die Batterien einlegen und auf die Geräteseriennummer (DSN) Ihrer Kamera zugreifen.
Indoor (1. Generation)
Der Riegel zum Entfernen der hinteren Abdeckung der Indoor -Kamera (1. Generation) befindet sich an der Unterseite. Schieben Sie den Riegel, um die Batterieabdeckung zu lösen.