Use this article to help you setup your Video Doorbell.
Blink Doorbell installation guide
In this video, we'll walk you through each step of installing your Blink Doorbell. To view this video in another language, in the top-right corner of the video, click the Gear icon > Audio Track, and select a language.
Setup instructions
1. Download the Blink app and create an account
If you already have a Blink account, skip to the next step.
Create a Blink account with the Blink app
If you're new to Blink, begin by downloading the Blink app. Once you have installed the app, you can proceed with creating an account.
Creating a Blink account
With Blink, you have one user account with one email address and phone number. Upon login and certain other actions, a verification number is sent to the mobile number or email address associated with the account. Learn more about setting up a second phone or device.
To get started with the Blink app:
- Open the Blink app and tap Create Account at the bottom of the screen.
- Select your country. Your country is pre-selected based on your IP address. To change it, tap Country, select from the list, then tap Save and Continue.
- Select your county (If applicable). Tap County, select from the list, then tap Save and Continue.
- Enter a valid email address, and tap Next.
- Create a password and tap Create Account. The password requirements are listed at the bottom of the screen. Tap the eye icon to display what you are typing.
- Enter the 6-digit verification code sent to your email, then tap Verify.
- Add a phone number to enable multi-factor authentication (MFA). Choose to receive verification codes via text or voice call. Tap Next.
- Enter the 6-digit verification code you received via text message (SMS) or voice call, then tap Verify (if you don't receive a code, wait 90 seconds and tap Resend Code; if verification fails, tap Try Again).
- Tap Continue to set up your location.
- Either manually enter your address, or select Use my current location.
Note: You may be prompted to grant app permissions to access your location and verify the address on your account. - After entering and verifying your address, tap Save Location.
- Tap Agree and Continue to link your Amazon and Blink accounts, or tap Skip in the top right to bypass this step.
After successfully completing all required steps, you'll be logged in to your Blink account. If you experience issues or require assistance in creating an account, contact Blink Support.
Signing into the Blink app
To sign in to the Blink app:
- Open the Blink app.
- Tap Sign In.
- Enter your email address and tap Continue. If you forgot your password, tap Forgot your password?
- Enter your password and tap Sign In. If a security check identifies your password as compromised, you will be prompted to change it.
- Enter the 6-digit verification code you received via text message (SMS), WhatsApp message, or voice call, then tap Verify (if you don't receive a code, wait 90 seconds and tap Resend Code; if verification fails, tap Try Again).
- To bypass verification when you log in using this device, select Trust this device (up to 30 days).
- If prompted, set up Two-Step Verification, then tap Next. To learn more, visit Securing your Blink Account with Multi-Factor Authentication.
After successful verification, you'll be logged in to your Blink account. If you encounter issues during the sign-in process, please refer to Troubleshooting Blink Account Login Issues.
2. Optional: Add your Sync Module
If you already have a Sync Module added to your system, skip to the next step.
How to install a Sync Module
Blink recommends using the video doorbell with a Sync Module for the best experience. It's important to add the Sync Module to your system first, and then add the device. Make sure to set up the Sync Module near to where you will be mounting the doorbell, for the most reliable setup of both devices.
After installation, you can use the Blink app's signal strength indicator to help choose a location if you wish to move the Sync Module.
Add a Sync Module and create a system
- From the Home screen, tap the + icon to add a device.
- On the Add Device screen, tap Sync Module.
- Scan the QR code on the back of the Sync Module or enter your Sync Module's serial number manually.
- Note: The Blink app may ask permission to access the camera on your mobile device in order to scan the QR code. If it asks, select Allow.
- Once the serial number is recognized, you are asked to create a new system. Tap the text entry box and provide a unique name for your system. If you have other existing systems, this name must be different from other system names you may have in your Blink account. Tap Continue after your new system name is entered.
- The Add Sync Module screen will instruct you to plug in your Sync Module and then wait for the light pattern of blinking blue and steady green. Tap Discover Device when you see this pattern on your Sync Module.
- Note: If you don't see the blinking blue light pattern, then you may need to reset the Sync Module. Learn more about how to reset the Sync Module.
- In order to connect to your network, the Blink app uses your mobile device to first connect to the Sync Module's temporary Wi-Fi network. It's named “BLINK-_ _ _ _" where the last 4 digits are from your Sync Module's serial number. Tap Join.
- After joining is successful, you are asked to join your local Wi-Fi network. Enter the Wi-Fi password and tap Join.
- The Add Sync Module screen displays 2.4 GHz Wi-Fi networks within range. If you do not see your local Wi-Fi network, tap Refresh List at the bottom of the screen. The Sync Module stores network information for devices that are added to its system. Learn more about how to troubleshoot Wi-Fi connections.
- When your Sync Module has been added to your new system, you will receive a completion screen. Tap Done to finish the process. You're now ready to add your new camera. The new system name displays at the top of your Home screen and you will also see the Sync Module. A cloud icon with a green connection line shows the Sync Module is successfully communicating with the Blink servers.
3. Determine how your Blink Video Doorbell will be installed.
Installation options for the Blink Video Doorbell
Blink Video Doorbell installation options
The Blink Video Doorbell can be installed in three ways.
Wired Installation
The Video Doorbell is powered by two, size AA 1.5 volt lithium non-rechargeable batteries.
Offers supplemental power supply, connection to your in home mechanical or digital chime, and extended battery life.
Connect a Sync Module to increase battery life up to 2 years of normal operation.
This installation type, combined with a Blink Subscription Plan, allows full functionality of the Blink Video Doorbell.
Wire-free Installation
The Video Doorbell is powered by two, size AA 1.5 volt lithium non-rechargeable batteries.
Allows your doorbell to operate wire-free and rely solely on battery power.
Connect a Sync Module 2 to increase battery life up to 2 years of normal operation.
This installation type, combined with a Blink Subscription Plan, allows full functionality but will not be able to ring an indoor chime.
Event Response
The Video Doorbell is powered by two, size AA 1.5 volt lithium non-rechargeable batteries.
In this setup, the Video Doorbell connects to Wi-Fi, but not to a Sync Module or existing doorbell wiring.
Receive motion alerts and doorbell button press notifications, and tap within 60 seconds to open a Live View session with two-way audio in the Blink app.
Other functionality is limited due to battery life conservation.
Learn more about Event Response.
4. Add your Video Doorbell
- Install the 2 AA 1.5 volt lithium non-rechargeable batteries.
- In the Blink app, tap Add device + in the top right of the home screen.
- Scan the doorbell's QR code.
- Choose a system or create a new one if needed.
- Connect the app to your doorbell's "BLINK" network and then to your Wi-Fi network.
- Follow the remaining in-app instructions to complete the setup.
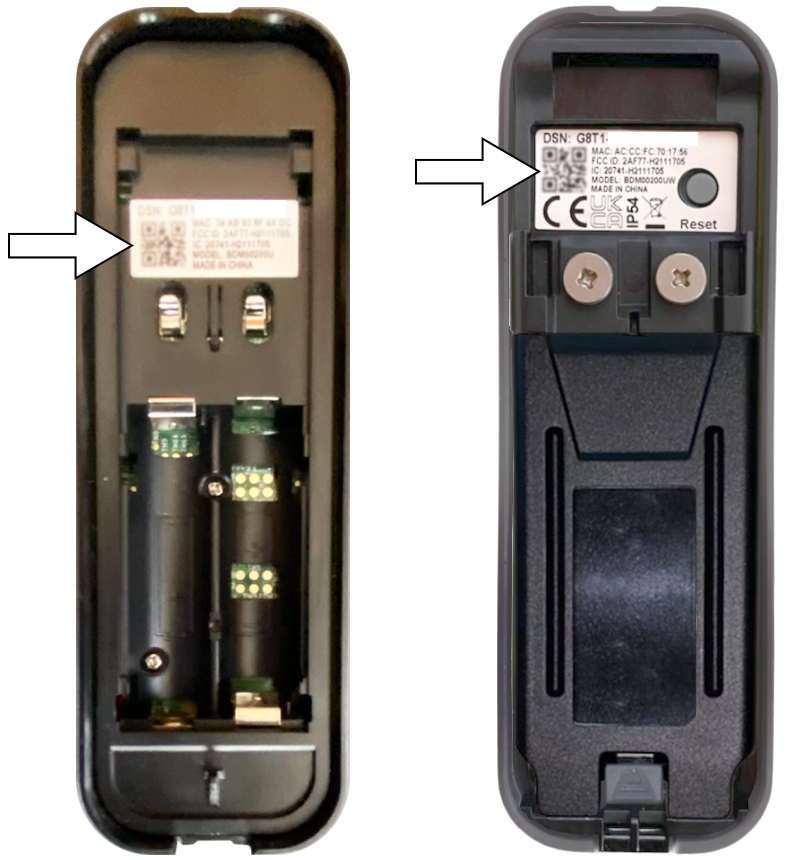
Where is the doorbell QR code?
The Blink doorbell has a QR code in the battery compartment to represent the device serial number (DSN).
5. Mounting the Video Doorbell
Tap the button depending on how you want to mount the doorbell and follow the steps accordingly. Otherwise, tap Maybe Later to skip these instructions and finish the installation.
The app will provide you with detailed instructions on how to mount your doorbell. For more information on mounting, learn more at Mounting the Blink Video Doorbell.
App instructions for mounting
If you choose to mount the doorbell later, you can find the mounting instructions within the app.
- Tap More (...) and select Device Settings
 .
.
- Tap Doorbell and Chime.
- Choose your setup. Tap either Mount with wiring or Mount without wiring.
6. Final steps
Congrats, you've completed adding the doorbell to your Blink system!
There's a few optional steps left to do.
Setting your camera name and thumbnail
When you first set up your Blink camera, the default name includes the model and last four digits of its serial number (for example, "Mini 2 - XXXX"), and the thumbnail (camera view) appears as a default image. You can personalize the camera name and thumbnail to better identify your camera's location and view. Customize the following settings at any time.
Changing your camera's name
- Tap the More button (...) at the bottom-right of the device's thumbnail image.
- Tap Device Settings.
- Tap General Settings.
- Tap the camera's current name, enter a new name (such as, Back Porch), and tap Save. Your new camera name now displays.
Important: When you update the name of your camera, clips recorded prior to the name change will appear in your Clip List as that previous name.
Refresh thumbnail
From the Home Screen, tap the More button (...) and select Refresh Thumbnail. The camera takes a screenshot of the current live view and replaces the blue image with this screenshot. The thumbnail remains the same until you refresh it using Refresh Thumbnail. The timestamp in the bottom-left corner of the thumbnail shows when the thumbnail was last updated. Learn more about using the Blink app.
Note: This process doesn't apply to the Video Doorbell (1st Gen) when it's in Event Response Mode, since the thumbnail is updated automatically each time the doorbell ringer button is pressed or a motion event occurs. Learn more about Event Response Mode.
Auto-Update Thumbnail
The Auto-Update Thumbnail feature allows you to refresh your thumbnail image on the Home Screen in the Blink app, with each camera motion event, doorbell press, or Live View session. Updating the thumbnail automatically provides you with information about the latest activity on your camera. Even if you move your camera, the Blink app will automatically capture a new thumbnail image, so you can easily identify each camera's location. See what's happening at a glance, right on your Home Screen.
The Auto-Update Thumbnail is available when you have the following:
- An active Blink Subscription plan or no-cost trial.
- Mini 2, Mini, Outdoor 4, Wired Floodlight, Video Doorbell, Indoor and Outdoor (3rd Gen) cameras.
Learn more about Blink Subscription Plans and features.
Setting Auto-Update Thumbnail
When you add a new eligible camera (as listed above) to your system, Auto-Update Thumbnail is enabled by default. However, this feature is initially turned off for any eligible cameras that were already on your system. Auto-Update Thumbnail can be turned on or off using the following steps.
- Tap the More button (...) in the bottom-right corner in the thumbnail image for your camera on the Home Screen.
- Tap Device Settings.
- Next, select Video and Photo Settings. The Auto-Update Thumbnail setting appears at the bottom of the screen, which can be toggled on or off for that device.
When you have Auto-Update Thumbnail enabled, you also have the option of manually setting your thumbnail for all devices on your account. The timestamp in the bottom-left corner of the thumbnail shows when the thumbnail was last updated. Learn more about how to manually set your thumbnail.
Helpful tips
If your doorbell is not found, an error screen appears and you are invited to retry. Tap Retry.
The doorbell notifies you it is ready to be added when the ring around the doorbell button flashes a red LED.
There are two ways to reset the doorbell.
- Remove the batteries: Remove the batteries for five seconds, replace the batteries, then wait for the red LED to blink.
- Reset the Doorbell: Press and hold the reset button with the batteries inserted (located on the back of the doorbell) until the red light flashes.
Device Settings
Use Device Settings to make other changes to your doorbell, such as adjusting your chime volume, motion detection sensitivity, and speaker volume.
From the Home screen on your doorbell's thumbnail, tap More (...) and select Device Settings . Learn more about how to adjust device settings.
If you do not see LED lights and you are sure that the batteries are new, please contact Customer Support.